Sprouted Mung Bean Curry

There is nothing like coming home on a cold autumn day to a bowl of steamy, cilantro scented, home sprouted beans. The mung beans take about 3 days to sprout, but are well worth the effort. This curry is great with rotis or rice; but I eat it just as it is. The quantities below will make about 8 servings, scale down if you need to.

To sprout mung beans: You need about 3 days to sprout the beans. Start by washing the beans well and soaking them in warm water over night. Then drain the beans and tie them into a bundle using cheese cloth. Place your mung bean bundle in a dish with a lid in a dark place. You will have sprouted mung beans in 2 days! For detailed instructions, see this video from http://showmethecurry.com/

Ingredients

Sprouted Mung Beans – 2 1/2 lbs. See video above for sprouting instructions
Onion – 1 large
Tomatoes – 3
Garlic paste – 2 tbsp
Ginger paste – 2 tbsp
Cumin – 1/2 tsp
Turmeric – 3/4 tbsp
Chili powder – 1/2 tbsp
Cumin powder – 1 tbsp
Coriander powder – 1 tbsp
Lemon juice – 1-3 tbsp
Cilantro for garnish
Oil – 2 tbsp
Salt – 1 1/2 tbsp

Chop the onion and tomatoes.

In a large skillet, heat the oil and add the cumin. When its fragrant, add the chopped onions. Saute till onions are soft. Then add the tomatoes and ginger garlic paste. Cook till the tomatoes break down. Now add the turmeric, chili powder, cumin and coriander powders. Saute for 30 seconds.

Slowly add the sprouted mung beans, salt and 6 cups of water. Bring to a boil. Cook beans on medium heat for about 15 minutes. Beans should be tender but not mushy. Turn off heat, stir in lemon juice and chopped cilantro. Taste the curry before adding the lemon; if your tomatoes are tart enough you might not need the lemon.

Sweet Sticky Rice Sushi

When we go out to eat sushi we always sit at the sushi bar. Mainly because S likes being perched on high bar stools. Sitting at the sushi bar gives me an advantage too. I can watch the sushi chef to make sure he washes his fishy hands before making my veggie sushi (usually oshinko). Making sushi at home however is problem free. For one, its cheaper, and I dont have to police fishy hands. No worrying about a lone fish roe clinging to my sushi roll! The best part is, I can play around and experiment with sushi ideas. Like sweet sticky rice sushi. I like rice paper wraps, I like sticky rice and I like adzuki beans. So I put them all together to make a dessert sushi. The rice paper does the job of the seaweed in a traditional sushi roll. The rice is cooked in coconut milk and rolled with a sweet adzuki bean filling. Its fun to experiment with the food coloring in this recipe. I love sakura mochi, so I tried to recreate the cherry blossom color by adding two drops of red coloring to the rice. The rice paper is colored to look like seaweed, exact food coloring proportions are below. I feel a little like Sandra Lee with all the food coloring!

Ingredients

Adzuki beans – 1/2 cup
Sugar – 7 tbsp (3+4). This will yield a mildly sweet sushi. Add more sugar if you like.
Sushi Rice – 1 1/4 cup
Coconut milk – 1 1/4 cup
Sesame seeds – 1/2 tbsp, toasted
Rice paper wraps – 6
Food coloring – red, blue, green
Salt – 1/4 tsp

To make the Adzuki beans: place the beans in a large pot with a lid. Add plenty of water and 1/4 tsp salt. Bring to a boil. Reduce to a simmer, put the lid on and let it cook. The beans should be done in about 1 1/2 hours. If you have excess water, drain it. Return the beans to the stove and let the moisture evaporate. Then add 3 tbsp sugar. Mix well and keep aside.

To make rice: While the beans are cooking, place the sushi rice, 1 cup water and 1 1/4 cup coconut milk in a pan. Bring to a boil. Then reduce heat, put a lid on and let the rice cook, about 25 minutes. The rice should have absorbed all the liquid. Turn off heat, add 4 tbsp sugar, the toasted sesame seeds, and 2-4 drops red food coloring and mix well. This will give you pink colored rice. Change up the colors as you like.

To make sushi rolls: Place a rice paper wrap on your work surface. In a small bowl, mix 2 tbsp water and 1 tsp sugar. To make a seaweed color, add food coloring to the sugar water in the following proportions: 10 drops green+4 drops blue+3 drops red. Using a basting brush, brush this colored water all over the rice paper wrap. Turn it over and brush the other side as well. In about 30 seconds the rice paper wrap will be soft and pliable. If your rice paper is still stiff, use warmer water or just use more water to brush on and let it soak another 30 seconds.

Now spread the rice evenly all over the rice paper; using your fingers is the easiest way to do it. Arrange the beans on top of the rice, but only on the end closest to you. Now, roll the rice paper away from you forming a sushi roll. Cut into pieces with a sharp knife.

Some Tasty Variations

Instead of adzuki beans, use fruits in the center of the roll. Mangoes or pineapple will work well.

To recreate fish roe, color some sesame seeds with orange food coloring and sprinkle on top of the cut sushi.

Curry Leaf Rice

I have known my friend, S for nearly 17 years. But it was only a few months ago that I found about about his love of curry leaves. S visited us from New Mexico a few days ago. He came bearing all sorts of goodies from New Mexico – Pinon nuts, jalapeno peanut brittle and red chile. In return, I decided to make him a dish featuring his favorite curry leaves. In fact, S was supposed to sleep in one morning, but woke up early and came down to the kitchen when he smelled the curry leaves cooking! Who can resist the rich, earthy aroma of curry leaf! This is an easy recipe, and fresh curry leaves add a lot of flavor to the rice. You can try it with cilantro too. We had this curry leaf rice at our wedding dinner. I fell in love with the flavors at the tasting and the caterer was kind enough to give me the recipe. His had a ton of butter (or was it ghee?) and fried cashew nuts. I cut out both and just used oil. I also added the coconut meat.

Ingredients

Long Grain Rice – 2 1/2 cups (I used Basmati)
Curry Leaves – 1 1/2 cups loosely packed
Coconut – 1/4 cup
Onion – 1 large
Ginger-Garlic Paste – 1 tbsp
Cumin Seeds – 1 tsp
Cloves – 4
Green Chili – 1
Lemon Juice – 2 tbsp
Oil – 4 tbsp
Salt

Heat one tsp of oil in a non stick saute pan, add the curry leaves and coconut and saute for 1 minute or until the curry leaves are fragrant. Let it cool slightly and then blend into a paste using about 1/2 cup water

Dice the onion. Heat another pan with the remaining oil. Add the chili, cumin seeds and cloves, after 30 seconds, add the onions. Saute till the onions are transcluscent. Now add the the ginger garlic paste. Saute another 30 seconds. Add the rice and stir for about 4 minutes on medium heat.

Then add the curry leaf paste, salt, lemon juice and 2 cups of water. Turn heat to high and let the rice come to a boil. Then reduce heat to low, and cover with a lid. Rice should be done in about 10 minutes. Turn off heat and let the rice sit for another 5 minutes.

Spread the rice on a large plate or platter and let it cool. This will ensure that the rice doesn’t turn mushy.

Kale and Jumping Corn Saute with Chili Lime Salt

I like blackened corn, so I was cooking some on my skillet on high heat for this dish. Just then, the big fat fly that has taken up residence in my kitchen appeared. Ive been trying to evict this fly for 4 days now. I even put some sugar by the window, hoping it would come for the sugar and I could shoo it out the window. But this is one healthy fly; it didn’t come for the sugar, but the minute i took the kale out, there it was! So I went chasing after it with tea towel in one hand and bug spray in another. By that time I had forgotten about the corn in my skillet. Having given up on the wild fly chase, I came back to the stove to find the sweet corn kernels jumping! They were all popping up and down in the skillet! (There was very little oil in the pan and it was very hot, I think that’s what made the corn kernels jump). So I decided to name them jumping corn.

Whether your corn is jumpy or not, this is a quick and easy recipe to make. I had it with left over quinoa. I decided to use the Chili Lime Salt I made a few days ago instead of regular salt. You can use regular plain salt and some paprika instead.

Ingredients

Kale – 1/2 bunch
Sweet Corn – 3/4 cup
Onion – 1/2
Garlic – 1 clove
Red Wine Vinegar – splash
Nutmeg – pinch
Chili Lime Salt (see this post for recipe) or substitute with salt and paprika
Sugar – pinch
Oil – 1 tsp

Slice the onion very thinly. Shred the kale into thin strips. Mince the garlic. In a non stick pan or skillet, heat the oil and add the onion and let it brown. When browned, sprinkle the sugar on top of the onion and push it off to one side of the skillet.

Turn the heat to high and add the corn. Position your skillet so that the heat source is right under your corn and not under the pile of onions on your skillet. Cook the corn about 3 minutes or till it turns brown (and jumpy!).

Now toss the onions and corn together. Lower heat. Add the garlic, saute till fragrant, about 30 seconds. Then add the kale, nutmeg, red wine vinegar and chili lime salt. Cook on medium heat till the kale is just wilted, about 2 minutes.

Chili Lime Salt

Chili lime salt is a great way to add interesting flavors to your foods and flavored salts are so easy to make. Try sprinkling  flavored chili lime salt on roasted nuts or popcorn or use in your everyday cooking.

Ingredients

Kosher Salt – 1/4th cup
Paprika – 2 tsp
Lime Juice – 1 tbsp

Place all ingredients in a food processor and blend together – as coarse or fine as you like. If needed, adjust lime and chili according to taste. Store chili lime salt in an air tight container.

Pasta with Seven Vegetable Sauce. Curing a Canned Food Obsession


eeeks! I misspelled ‘obsession’ :( But that’s the charm of homemade canned food.

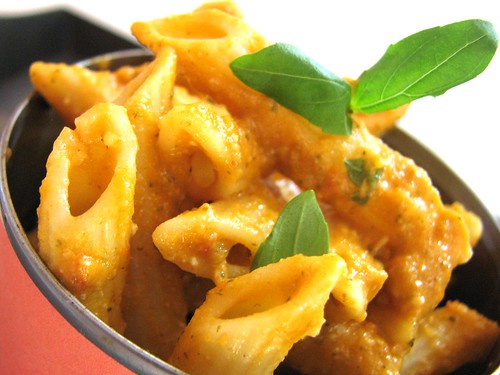
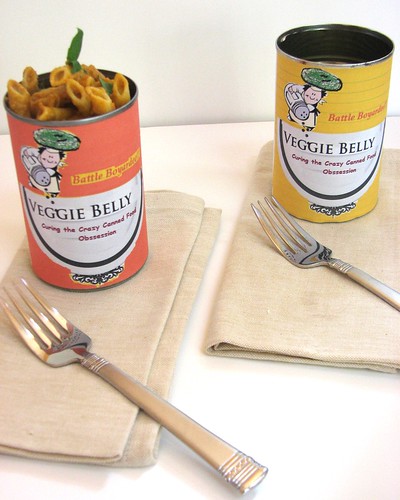
My husband S, loves all things canned. He is particularly partial to Chef Boyardee; he cant resist those 10 for $10 deals. And S eats the stuff straight out of the can. In an attempt to cure the canned food obsession, I make fake canned food. I put my own labels on the cans and fill them with homemade food. Battle Boyardee! The very first time I did this, S was on the floor laughing. But he enjoyed the food. Its so much healthier and tastier than canned pasta swimming in what used to be tomato sauce. I made penne with a seven vegetable sauce today – full of fresh veggies, basil and pine nuts for creaminess. The tomatoes, carrots and bell pepper add both color and sweetness. The pine nuts – toasted and pureed – elevate the sauce to a nutty silkiness.

I always use newly opened cans to serve the pasta in. I transfer the contents to another container for use later. (If you are using tomato cans, just use the tomatoes for the sauce recipe)

Ingredients

Pasta – 1 box, I used Penne
Onion – 1 large
Garlic – 6 cloves
Carrots – 2
Celery – 2 stalks
Red Bell Pepper – 2
Tomato – 3
Broccoli – 1 floret
Pine Nuts – 1/4 cup, substitute with cashews or almonds
Olive Oil – 4 tbsp
Water – 3 cups
Marsala Wine – 2 splashes, optional
Basil – 1/2 cup
Parsley – 2 tbsp
Salt – 1 tbsp
Pepper

Finely chop the onions and chop all other vegetables into chunks. Toast the pine nuts in a skillet on low heat untill they turn light brown.

Boil pasta in plenty of salted water, till al dente. If you are not using the pasta immediately, wash it in cold water and set aside.

In a large wok, heat the oil. Add the onions and fry on medium high heat till they turn golden brown – about 5 minutes. Make sure you take the time to caramelize the onions, they add a nice sweetness to the sauce.

When the onions are well browned, add the garlic and saute 1 minute. Then add all chopped vegetables. Saute on medium high for 7 minutes. Then add the salt, and marsala wine and cook till the wine evaporates, about 2 minutes.

Pour in the water and let it boil. Then reduce heat and let the vegetables simmer for about 5 minutes.

Cool the vegetables slightly and place them in a blender. Blend till they are pureed. Return the vegetable puree to the wok. Simmer on low heat. At this point, the sauce will boil and splatter, so cover with a lid of aluminum foil. Let the sauce simmer on low heat for about 12 minutes, stir once or twice. (Now is a good time to start boiling the pasta).

While the sauce is simmering, blend the pine nuts into a smooth puree with a little water. Add the pine nut puree to the vegetable sauce in the last 2 minutes of cooking. You want a thick sauce, like the consistency of marinara. If your sauce is too runny, simmer it longer.

Turn off heat and stir in chopped basil, parsley and cracked pepper.

To serve, spoon the vegetable sauce over the pasta and garnish with basil.

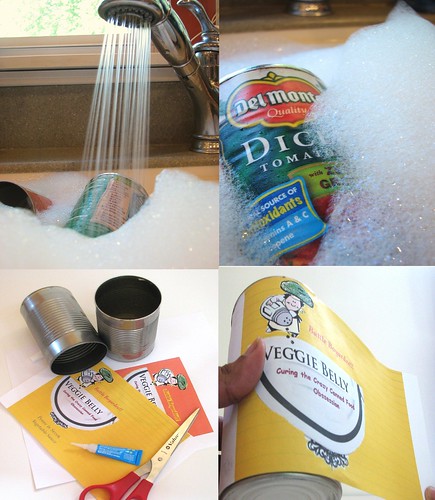
Its very easy to make the cans to serve in. Always use newly opened cans, old ones may rust. Soak tomato or other cans in very hot soapy water for about 1 hour. Peel the labels and let the cans air dry. Print out your own labels and cut them to the can size. Using 3 dots of super glue on one end of the label, stick the label to the can and wrap it around the can firmly. Using 3 more dots of super glue, stick the other end to the can. Warning: Cans may have jagged rims, so be careful.

Did I win Battle Boyardee?

Buckwheat Soba Noodles in Leek Ginger Broth

I was thinking of my August trip to England. On a chilly, rainy day much like today, I went to a Wagamama restaurant in Bristol, England. (It can be chilly and rainy in even in the summer; its England!). I had pan fried Soba noodles at Wagamama. Ever since then, Ive been wanting to make Soba noodles at home. Its getting colder here, so the cooking needs to get warmer. An added benefit to this recipe is that I get my soba fix and soup fix in one dish!

We had this for dinner and some store bought mochi for dessert. The mochi vanished in 12 seconds, so I don’t have a picture!

Soba noodles are made with buckwheat. In Japan, they are eaten cold with a dipping sauce in summer and in a warm broth in the winter. My broth is not traditional, but it does pair well with the soba. You can buy soba noodles in an Asian grocery store.

Ingredients
 
Soba Noodles – 3 bundles
Garlic – 3 cloves
Ginger – 2 inch piece
Leeks – 1
Green Onion – 1 stalk
Red Bell Pepper – 4 tbsp finely chopped
Broccoli – 8 florets
Pickled Ginger – 8 pieces
Soy Sauce – 2 tbsp
Mirin – 4 tbsp (substitute with rice wine or cooking wine and 1/2 tbsp sugar)
Lemon Juice – 2 tbsp
Water – 5 cups
Salt
Oil – 1/2 tbsp

Peel the ginger and cut into large pieces. Trim the tough leaves of the leeks, chop into rings and wash them in cold water to remove the grit. Chop the red bell pepper finely. Chop the green onion stalks at an angle.

Heat oil in a stock pot or similar heavy bottomed pot. Turn the heat to high, when the oil is almost smoking, add the ginger, garlic and leeks. Saute on high for about a minute. Then reduce heat and saute another 2-3 minutes.
Pour in the water and bring to a boil. When the water is boiling, reduce heat and simmer the broth for about 10 minutes. Strain the broth, reserving only the liquid.
Return broth to the stove. Add the soy sauce, mirin and lemon juice. Taste the broth and adjust seasonings and salt. Simmer another 4 minutes. In the last 1 minute of cooking, add the broccoli florets.

While the broth is simmering, work on your soba noodles. Bring water to a boil in a pot. Then add the soba noodles. Bring back to a boil. Then reduce heat and simmer the noodles. They should be done in about 5 minutes.

Drain the noodles into a colander and wash them with plenty of cold water. Drain well before using.

To serve, place some noodles in a bowl and pour the stock over the noodles. Sprinkle chopped red pepper on top. Garnish with green onion and pickled ginger.

Some Tasty Variations
 
Add seaweed in the broth for a healthy ocean flavor
Try shelled edamame instead of broccoli
For a simpler broth just use vegetable stock and soy sauce
Add miso paste to the broth for miso-soba soup
Top your soba noodles with Flexitarian’s wonderfully unique Tofu Croutons

Related Posts with Thumbnails