Vegetarian Sri Lanka – Photos and Recipes From the Spice Island

Golden Buddha at Dambulla

My recent trip to Sri Lanka was a dream come true. My grandfather as well as my husband’s grandfather had business ties in Sri Lanka. When he was a young man, my grandfather worked in Colombo. I grew up hearing stories about this beautiful island – stories of colonial bungalows, lush tea estates, Hindu temples, and train rides. I am so excited that I finally was able to make the trip to the spice island and experience its magic for myself.

Vegetarian food in Sri Lanka was easy to find. I found plenty of delicious vegetarian local dishes. Food in Sri Lanka was comfortingly familiar. Rice and coconut feature heavily in Sri Lankan cuisine, just like in South India. But unlike India, they use pandan leaves in cooking, and treat it just like curry leaves.

If you are a vegetarian traveling to Sri Lanka, here are some must-eats..

Vegetarian lunch - Red rice, chili pickle, snake gourd with coconut milk, water spinach, beetroot curry, dal curry and papadam


A Vegetarian’s Guide to Sri Lanka

Rice and Curry – This is a staple in Sri Lanka and you will find plenty of vegetarian options. During my trip, I had dal curry, jackfruit curry, snake gourd curry, potato curry, coconut milk curry scented with pandan, pumpkin curry, beetroot curry and cashew curry. If you are a vegetarian and you like rice and curry, you will never be hungry in Sri Lanka!

Sambal – Sambal is a spicy condiment made of crushed red chillies and is ubiquitous on the island at meal time. There are many kinds of Sambal. Lunu miris sambal is made with red chillies, onion, lemon and salt. Pol sambal is made with fresh shredded coconut and red chillies. Katta sambal contains caramelized onions and chillies.

Hoppers – I could eat Sri Lankan hoppers every meal of every day. These bowl shaped rice and coconut milk crepes (Appa) are an iconic breakfast item. Hoppers come in many kinds. I tried honey hoppers sweetened with local honey, egg hoppers, curry leaf hoppers, beet hoppers and spinach hoppers. String hoppers (Idiappa) are steamed rice noodles nests and a Sri Lankan breakfast favorite.

Stuffed Roti – Flatbread stuffed and folded with spicy fillings (vegetarian easily available) are a common street food. Roti is cheap, filling and a great snack.

Kotthu Roti – This street food was my all time favorite. Kotthu roti means “chopped” roti. Shredded rotis are mixed with vegetables and spices and stir fried. Watching street side kotthu roti makers is fun – they throw vegetables and shredded rotis on a griddle and chop them using special flat knives, making rhythmic sounds.

Sri Lankan Chinese – Yes, such a thing exists! Chinese dishes like fried rice, soups and spring rolls are common items on restaurant menus. Chinese food in Sri Lanka is adapted to suit local tastes and to use local ingredients like chillies. I particularly loved Sri Lankan Chinese chili paste – a sweet and hot paste made by sauteing crushed chillies, ginger, garlic, soy sauce and sugar. Its like a Chinese sambal! Some of these pastes contain shrimp, so ask first.

Tea – Sri Lanka is blessed with abundant rainfall and humidity that are conducive to tea growing. Not surprisingly, this tiny country is one of the world’s largest exporters of tea. In Sri Lanka, you will find regular black tea, cardamom tea, ginger tea, and tea sweetened with condensed milk.

Spices – There is an abundance of spices in Sri Lanka. The country’s cooking uses numerous spices like cinnamon, black mustard, cardamom, coriander, cumin, etc. Sri Lankan cinnamon is especially fragrant and tasty, so make sure you bring back a packet or two when you are visiting.

Street side kotthu roti shop in Sigiriya

At Chuti, a street side kotthu roti shop in Sigiriya. The owner is making my lunch.

Curd and treacle (coconut molasses)

Pots of wood apple tea and black tea brewing at a street side shack

Wattalappan – A pudding of coconut milk, jaggery, eggs and cardamom
http://www.veggiebelly.com/wp-content/upLoads/2014/03/sri-lanka-6.jpg

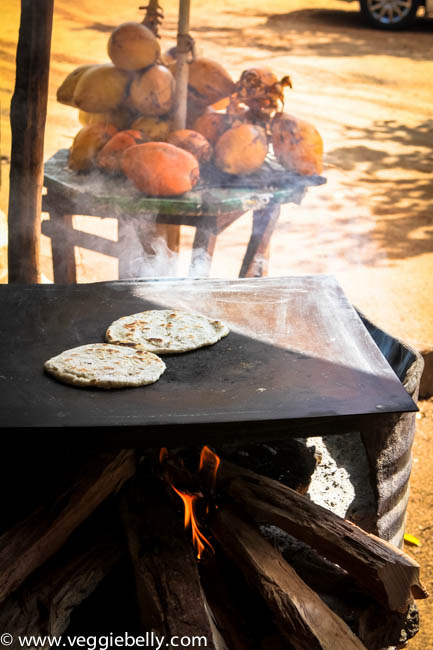
Coconut rotis (recipe below) and king coconuts

http://www.veggiebelly.com/wp-content/upLoads/2014/03/sri-lanka-5.jpg
http://www.veggiebelly.com/wp-content/upLoads/2014/03/sri-lanka-19.jpg
http://www.veggiebelly.com/wp-content/upLoads/2014/03/sri-lanka-18.jpg
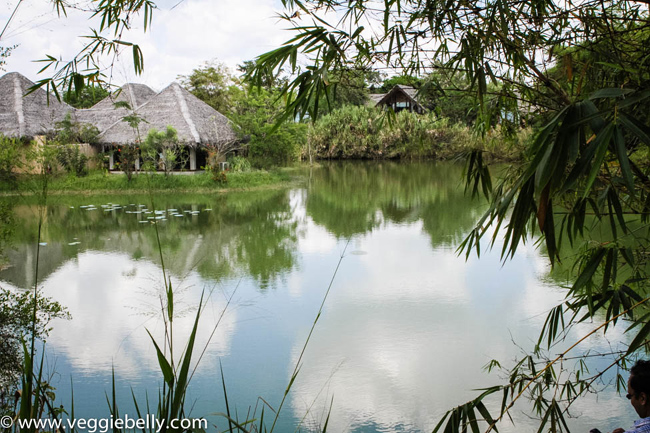
View of the library from our room. Vil Uyana eco-resort, Sigiriya.

Exploring Sri Lanka’s Cultural Triangle

http://www.veggiebelly.com/wp-content/upLoads/2014/03/sri-lanka-16.jpg

http://www.veggiebelly.com/wp-content/upLoads/2014/03/sri-lanka-15.jpg

http://www.veggiebelly.com/wp-content/upLoads/2014/03/sri-lanka-14.jpg

Woman in Sri Lankan sari worshiping at Polonnaruwa

Monk at Anuradhapura Maha Bodhi Temple

Entrance to Dambulla cave temples

Dambulla cave temples

Polonnaruwa ruins


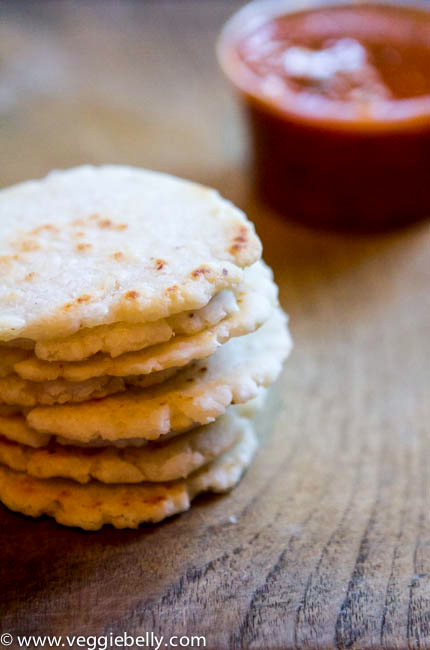
Coconut Roti (Pol Roti) Recipe

I had coconut roti or pol roti in Sri Lanka almost everyday for breakfast. It is the easiest flat bread you can ever make. And its vegetarian, vegan and gluten free too!

I recommend using fresh shredded coconut. There are so few ingredients in this dish, and the coconut is the highlight, so use the freshest coconuts possible. Good quality fresh frozen shredded coconut is a second option. Also remember to salt the rotis well. The salt will really enhance the coconut taste in these pol rotis.

http://www.veggiebelly.com/wp-content/upLoads/2014/03/patting-pol-roti-sri-lanka-1.jpg

Flatten coconut roti dough on banana leaves or foil

The pol rotis I saw in Sri Lanka mostly had all purpose flour in them. But I prefer using rice flour, its lighter and tastier in my opinion.

http://www.veggiebelly.com/wp-content/upLoads/2014/03/sri-lanka-24.jpg

http://www.veggiebelly.com/wp-content/upLoads/2014/03/sri-lanka-25.jpg

Coconut Roti Recipe
makes about 20 small (3 inch) rotis

Ingredients
1 cup rice flour. Substitute with all purpose flour
3/4 cup fresh shredded coconut
salt
oil

Method
1. Place all ingredients a large bowl. Using water, bind the flour and coconut into a slightly firm dough. When the dough is done, it should not be sticky, and have a consistency that is like chappati dough.
2. Form the dough into lemon sized balls. Take a piece of foil, a zip lock bag or a piece of fresh banana leaf. Spread it with a drop of oil. Oil your palm and fingers with a few drops of oil as well. Put a dough ball on the oiled foil/ziplock/banana leaf. Gently pat it and flatten it into a 0.3cm thick disc (see picture above).
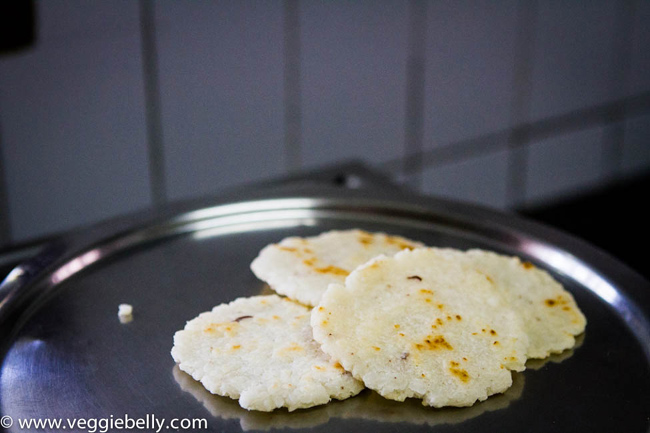
3. Put the flattened roti on a cast iron skillet on medium heat. Put as many rotis as will fit on the skillet. Drizzle a few drops oil around the rotis. Cook, flipping a few times till both sides form brown spots. Remove from skillet and repeat for all the dough balls.
4. Serve with chutney, pickle or sambal.

_____________________________________________________________________

Enter for a chance to win a Sri Lankan Spice and Tea Hamper!

India shipping only!

I’ve bought back a ton of goodies from my trip to Sri Lanka and have put together a hamper for you!

One lucky winner will receive this gift hamper containing:

1. Red rice string hopper flour – so you can enjoy this Sri Lankan specialty at home
2. Unroasted curry powder – use it to make a curry for your hoppers
3. Roasted curry powder – perfect for Sri Lankan curries
4. Sri Lankan cinnamon – fat sticks of fragrant cinnamon from the island. A little goes a long way
5. Deviled cashew nuts – careful, they are hot!
6. Hand made paper bowl
7. Balisur Tea Book – Authentic Sri Lankan tea in a tin shaped like a book. You get your choice of black tea or Ceylon green tea with bergamot
8. “Rice & Curry ” a Sri Lankan cookbook by acclaimed writer, S.H.Fernando  – so you can put your goodies to good use :)

a Rafflecopter giveaway

If the Rafflecopter is not working, simply leave a comment below and you are entered!

Tomato Coconut Stew. Remembering my grandmother through her favorite recipes.

My paternal grandmother passed away a year ago this month. My grandmother raised me, and taught me a great deal. In her memory, I will be posting a series of her favorite recipes. The first in the series is this tomato stew with coconut milk. My grandmother relished this dish, often eating it with steaming hot idlis for dinner.

I’ve already written a little about my grandmother and what an accomplished woman she was in this post. In this series, I will share more memories of her through her favorite recipes. My grandmother was far ahead of her times. She pursued higher education, a career and a public life – something very few Indian women did during her time. She was a PhD in philosophy and literature, a public speaker, author of many books and an educationalist. And she spent a life time championing womens’ education in India.

Not only was she a career woman, she also enjoyed hosting and entertaining guests in her home..

Tomato stew with coconut milk - one of my grandmother's favorites.

My grandmother playing with my iPhone on Pongal day 2013. This was the last picture taken of her.

Diwali, 2002

Getting ready for bedtime, 1982

My grandmother’s dinner parties were legendary and her hospitality impeccable. Although she never took an interest in cooking, she had a keen palate and a great love of hosting and feeding people. She would give her cook, Mariappan detailed instructions before the dinner parties. She would have the coconut trees in her lawn decorated with strings of light bulbs. She took care of every detail – the decoration, neatly folded napkins, extra large sized silver plates, polished cutlery, and a lovingly curated menu.

A typical menu made by the talented cook Mariappan would include tomato rasam and rice wafers for dipping, green pea rice scented with cumin, plump vegetable cutlets coated with golden bread crumbs, fried puris, fragrant garlicky cauliflower masala and delicate sweet polis made with lentils, cardamom and drenched in ghee. As a child, I looked forward to those balmy evenings when my grandmother would regale her guests, laughing, quoting poetry, and coaxing them to eat more. Nobody ever went home hungry after visiting my grandmothers house!

Even in her passing she found an opportunity to entertain people. Let me explain. Where I come from in India, it is customary to host a lunch in the honor of the deceased a few days after the funeral. My grandmother must have known intuitively that her death was near. So one week before her passing she wrote out the menu for the post funeral lunch, along with detailed instructions on how it should be served. Thats right, my grandmother made the menu and gave instructions for her own funeral lunch!

As per my grandmother’s wishes, my family organized a multi course lunch, with four desserts (she had quite the sweet tooth!) served on the largest, freshest banana leaves on the very same lawn where she had regally presided over dinner parties for fifty years. It was the best send off we could have given to a woman who was so passionate about food, people and life.

It is an honor to have been raised by a woman who was so intelligent, beautiful and exuberant. Her life was grand and her love was abundant. This post is the first in a series of recipes I will be posting as a tribute to my grandmother. These recipes have all been tried and tested over decades. Every single recipe I will be posting was a favorite of my grandmother’s. Each one brings back a flood of memories.

In creating these posts, I am filled with tremendous pride to have been part of this incredible woman’s life, and at the same time I am filled with great grief that she is no more.


Tomato Coconut Stew

serves about 4 as an accompaniment/curry

Ingredients
1 lb ripe tomatoes
1 tablespoon oil
1/4th teaspoon mustard seeds
1/4th teaspoon urad dal
1 small onion, minced
5 cloves garlic, chopped
6 curry leaves
1/2 teaspoon tumeric
1 teaspoon chili powder
1 cup coconut milk
1 tablespoon chopped cilantro

Method
1. Bring plenty of water to boil in a saucepan. Drop the tomatoes into the water. Let them boil till their skins blister, about 2 minutes. Then drain.
2. When tomatoes are cool enough to handle, peel and discard the skins. Then puree the tomatoes without any water. Set aside.
3. Heat oil in a medium saucepan. Add the urad dal, and mustard seeds.
4. When the mustard seeds pop, add the onion, garlic, curry leaves and cook for about 2 minutes.
5. Pour in the tomato puree, chili and turmeric powders, salt, and 1 cup water. Bring to a boil.
6. Then reduce heat, and cook on medium-low heat, uncovered, till the sauce becomes thick. About 15 minutes.
7. Add the coconut milk, stir, and turn off heat.
8. Garnish with cilantro. Serve with roti, idlis, dosa, or neer dosa.

Rice and Coconut Crepes (Neer Dosa) Recipe


Neer dosa is a savory rice and coconut crepe from southern India. I first had neer dosa when my mother’s best friend Jayanthi Aunty, took me to Mathsya, an Udipi style restaurant in Chennai, India. She insisted I get these delicate, coconutty dosas. But I was hesitant at first. I like my dosas big, golden and crisp. These were quite the opposite – soft and delicate. But still, I let Jayanthi Aunty order neer dosas for me. Now, I’m usually super picky and particular about what I order in restaurants. But with Jayanthi Aunty, its different. I trust her. She’s known me since childhood, and knows what I like and don’t like. Besides, she has impeccable taste in everything from clothes to jewelry to furniture to food. So I wasn’t surprised when the neer dosas arrived. They were fluffy, soft and melt-in-your-mouth delicious.

Thankyou, Jayanthi Aunty for making me get that very first neer dosa. It was love at first site!

After I had my first neer dosa, I set out to perfect the making of neer dosa at home. I don’t live in Chennai, and can’t go to Mathsya for my neer dosa. So I had to figure this out at home. I’ve arrived at this recipe after a lot of trial and error, and I have to say its fabulous. I’ve now been making this neer dosa recipe at home at least once a week!


Like all dosa and idli batter, you need a good solid grinder. In my kitchen thats either my Ultra wet grinder or my Vitamix. For this recipe I used the Vitamix. Its easier to clean up after you are done blending and the Vitamix can easily grind the neer dosa batter to the super fine consistency that is key. Don’t have a Vitamix or similar powerful blender? I am giving away a Vitamix to one lucky Veggie Belly reader! Go to this post to enter for a chance to win!

Tips for the perfect Neer Dosa

- Consistency. Batter consistency is important. The batter must be a little thicker than whole milk. Also, grind the batter very finely. If you dip your thumb and index fingers in the batter and rub them together you should feel no grit or grain.

- Hot skillet. Your skillet must be very hot before you pour the batter over it. Sprinkle a few drops of water on your skillet. If the water sizzles and bubbles away within 5 seconds, your skillet is hot enough. A hot skillet is also what makes the holes form in the dosa and makes it lace-like.

- Work quickly. Because you are working with a hot skillet, you must pour and spread the batter very quickly so that a perfectly round dosa forms. The whole process of pouring the batter and swirling the pan so the batter coast it, should take about 10 seconds.

- Practice. Watch the video I’ve included below and practise making a few dosas, you will be an expert in no time.

http://youtu.be/Q8USFqvi9hQ

Neer Dosa Troubleshooting

Neer Dosa sticks to the pan – Your batter might be too thin or too cold. If the batter is too thin, you will have to start over. The ideal consistency of batter is slightly thicker than whole milk. If you are using refrigerated batter, let it come to room temperature first; cold batter will stick to the pan. An under seasoned pan will also make neer dosas stick. Usually the first 2 dosa will stick, and then they will start to come off the pan easily as the pan gets seasoned. A non-stick pan always helps.

Neer Dosas are cracking – Soak the rice longer if dosas are cracking. Adding a little extra cooked rice (1 tablespoon extra cooked rice per cup on raw rice soaked) to the batter will also help bind the batter and prevent neer dosas from cracking.

Neer dosas batter doesn’t coat the pan well – If your batter is too thick, it may not move around the skillet and coat it well to form a proper round. Dilute the batter with water till it is slightly thicker than whole milk. Cold batter also won’t glide and coat the pan, so make sure the batter is at room temperature.

Neer dosas are too brown – Your pan is either too hot or you’ve used too much coconut. But browned neer dosas are still tasty!

Neer Dosa Recipe

makes 16 eight inch dosas

Ingredients

1 cup sona masoori, or any other short grain raw rice
1/4th cup fresh grated or frozen coconut*
1 tablespoon cooked rice, optional
1/2 teaspoon salt
Vegetable oil

*You can vary the coconut quality according to taste. Use as little as 2 tablespoons and up to 1/3rd cup.

Method
1. Soak the rice in plenty of water for at least 4 hours and upto 8 hours (over night). Then drain the water.
2. Place the soaked rice, grated coconut, cooked rice if using, and 1 cup water in a Vitamix or similar powerful blender. Blend on medium speed for about 1 minute. Then crank up the speed to medium high and blend till the batter is very smooth, without grains or grit. If the batter gets hot during blending, throw in one or two ice cubes.
3. Add 1 more cup of water and salt and blend for a few seconds. The batter should be a little thicker than whole milk. If its too thick, add water to dilute it. You should have approximately 4 cups of batter.
4. Let the batter rest, covered for 1 hour. This is optional. You can also use the batter right away.
5. Heat an 8 inch non stick skillet on high heat. When you sprinkle a few drops of water on the skillet, it should bead up and sizzle away in under 6 seconds.
6. Dip a wad of paper towel in oil, and wipe the skillet. This will season the skillet.
6. Mix the batter well, and keep it near you. Pour 1/4th cup of batter into the center of the skillet. Immediately, shake back and forth and swirl the skillet so that the batter coats the bottom of the skillet completely and holes start to form on the surface. (See video above)
7. Drizzle a few drops of oil around the dosa. (If you are using a good non stick skillet, you can get away with not using any oil at all if you wish).
8. Now cover the skillet, reduce heat to medium and cook for about 30 seconds. The neer dosas should not brown. Remove lid, and cook another 30 seconds or till the dosas are no longer liquidy, come off the skillet easily and are still fairly white in color.
9. Fold the dosa into a semi circle and then again in half to form a triangle.
10. Bring the pan back up to high heat, and repeat for the remaining batter.

11. Serve neer dosas with chutney, podi or crushed jaggery

Homemade Date Cardamom Almond Milk and a Vitamix Giveaway


Making almond milk at home is super easy. The total amount of work involved is less than 10 minutes and the benefits of homemade almond are numerous. For one, you get to control what goes into the almond milk. You control the sweetness and flavoring. And there are no chemical additives in home made almond milk. All thats in it are almonds and water and whatever flavoring you choose to add. Pure and simple.

I like adding Indian flavors like cardamom when I make almond milk at home. It reminds me of the traditional badam kheer – which is a heavy smoothie of milk, almonds, cardamom and saffron. In this recipe, I’ve lightly sweetened the almond milk with dates. You can leave it out for unsweeted almond milk or add sugar instead of the dates.

If you have a Vitamix, its the best way to make almond milk at home. It blends the soaked almond into a creamy puree in no time. If you don’t have a Vitamix, use whatever powerful blender you have. Or enter the Vitamix giveaway below for a chance to win this awesome blender!

When you are done making the almond milk, you will have almond meal as a by product. Don’t throw it away. Its good stuff! I save the almond meal in a zip lock bag or tupperwear and add a little to my breakfast smoothies. Others like to dehydrate the almond meal, and freeze it for use in cookies etc.

Home made almond milk will keep in the fridge for about 5 days.

Homemade Date Cardamom Almond Milk Recipe

Makes about 4 cups

Ingredients
1 cup raw almonds
1-2 cardamom pods
4-6 seeded dates
4 saffron strands. Optional

Method
1.Soak the almonds in plenty of water over night, about 8 hours.
2. Drain the soaked almonds, and put them into a blender (I used my Vitamix), along with 3 cups of water. Add the cardamom and dates to the blender.
3. Blend on medium-high speed till all the almonds are well blended into a homogenous puree, about 2 minutes.
4. Line a fine mesh strainer with two layers of cheese cloth. Place a bowl under the strainer. Pour the pureed almonds into the strainer, gather up the cheese cloth into a ball, and gently squeeze till all the almond milk comes out.
5. This first extract of almond will be thick. Add more water to it to dilute it to your preferred consistency.
6. If you wish, you can make a second extract – scoop the almond meal in the strainer and put it back in the blender. Pour 1-2 cups water and blend. Strain the second extract of almond milk through the strainer. This extract will be thinner. You could also use this thinner second extract to dilute the thicker first extract.
7. Sprinkle saffron strands, if using, on top of the almond milk.
8. Home made almond milk will keep in the fridge, in an air tight container for about 5 days.

 _______________________________________________________

Vitamix Giveaway

Enter for a chance to win a Vitamix 5200! 

a Rafflecopter giveaway

Only US & Canada Shipping.

Thanks Vitamix for sponsoring this giveaway!

Related Posts with Thumbnails