Cream of Fennel and Leek Soup

When we went to Turkey, we frequented the bar at the Kybele hotel in Istanbul. The bar tender was a laid back, super friendly guy who even let me make my own drinks at the bar! One night, I wanted to try Raki – an anise/fennel flavored Turkish liquor. I took one sip of it and spat it out. It was terribly strong and tasted awful. “Women don’t like the taste of anise” said the bar tender. I believed him; after all I don’t like liquorice and didn’t like Raki. But all that changed when I first had fennel soup. I loved the light onion flavor of fennel. Fennel is also wonderfully bright, citrusy and mild. I saw a very nice recipe for fennel soup on the eatingclub vancouver blog. I liked that the recipe used white wine. So that’s what Ive done in my recipe as well to concentrate the flavors of the fennel and leeks.

Ingredients

Fennel – 1 bulb
Leeks – 1 stalk
Heavy Cream – 1/2 cup
Wine – 1/2 cup
Water – 3/4 cup
Olive oil – 1 tbsp
Salt – about 1 1/4 tsp
Pepper

Chop the fennel into rough pieces, don’t use the tough top green stalks. Reserve the fennel fronds for garnishing. Chop the leeks and clean them by soaking in cold water to remove the grit.

Heat a pot with olive oil. Add the fennel to the oil and saute for about 10 minutes. Then add the chopped leeks. Cook on medium another 3 minutes.

Add salt and pour in the wine. Increase the heat to high and let most the wine evaporate – about 2-3 minutes. Now pour in the water and bring to a boil. Simmer for about 5 minutes or till the fennel is soft. Cool the mixture and puree into a smooth soup in a blender. Return to heat, when the soup is hot, turn off heat, stir in the cream and some cracked pepper. Garnish soup with fennel fronds.

Brown Rice Pilaf in Acorn Squash Bowls

My entire neighborhood is ablaze with fall colors. Everything around me seems to be a brilliant, orange or red. There is no better time than now to bring out that Acorn squash that’s been sitting on my counter. Its the perfect shape and size to stuff with a fluffy, nutty brown rice that smells like the fall. But I’ve always wondered how squash got its name. Winter squashes especially are so hard, you cant exactly “squash” them! Then I discovered that the name comes from the native Indian word “Askutasquash” which means “eaten raw”. So here is my recipe for brown rice pilaf in askutasquash bowls :)

This is my entry to Culinary Bazaar’s blog event, A Worldy Epicurean’s Delight. This month’s theme is American food.

Ingredients

Acorn squash – 6
Brown rice – 1 cup
Vegetable stock or water – 1 3/4 cup
Onion – 1
Garlic – 4 cloves
Carrot – 1
Celery – 2 stalks
Water chestnut – 1/4 cup chopped. Substitute toasted walnuts.
Thyme – 1 tsp
Cinnamon powder – 1/4 tsp
All spice or clove powder – 1/4 tsp
Nutmeg – pinch
Lemon juice – 1 tsp
Parsley chopped
Salt – about 1 1/2 tsp
Pepper
Olive oil or butter – 2 tbsp

Pre-heat oven to 400. Wash and dry the squash. Place on a kitchen towel and carefully cut the top off with a sharp knife like the picture below. I like to score the top first where I want to cut it. Then I make the deeper cuts to remove the cap. Trim some of the flesh off the cap. Scoop the seeds and fiber out. Drizzle a little olive oil on the inside of the squash, sprinkle with salt and pepper. If the squash is not stable, slice off a little from the bottom of the squash to make a stable base.

Pour a little water in an oven proof pan. Place the squash with lids on in the pan. Bake in the oven for about 1 hour and 15 minutes. Check the squash half way through, if the water dries up, add a little more. If the tops are getting burnt, cover with foil. Squash is done when it is fork tender.

To prepare the rice, heat a skillet with olive oil. Chop the onion, carrot and celery finely. Add to the oil and saute for about a minute. Then add minced garlic and saute another 30 seconds. Add the rice, thyme, cinnamon, nutmeg, all spice/clove. Saute on medium heat for about 4 minutes. Pour in the vegetable stock or water, lemon juice, salt and pepper. If you are using stock, you’ll need less salt.

Bring to a boil. Then reduce heat, cover the pan and let the rice simmer for about 30 minutes or till cooked. Cooking time may vary depending on your rice.

Stir in the parsley and water chestnut/walnuts. To serve, spoon the rice into the acorn squash bowls. Scoop the squash along with rice to eat.

Spinach and Pinto Bean ‘Mole-chilada’

A couple of months ago I went to a Mexican restaurant with my Colombian friend J. When he noticed on the menu that they serve mole, he leaned over and told me that Colombia invented mole, not Mexico. (Fact check: Mole is Mexican! read this). J then proceeded to harangue the wait staff about how Mole is actually Colombian and not Mexican. 15 minutes later, I was still hiding my face in the menu, the waiters were still staring at J, and J was unleashing his Mexican mole conspiracy on the entire restaurant.

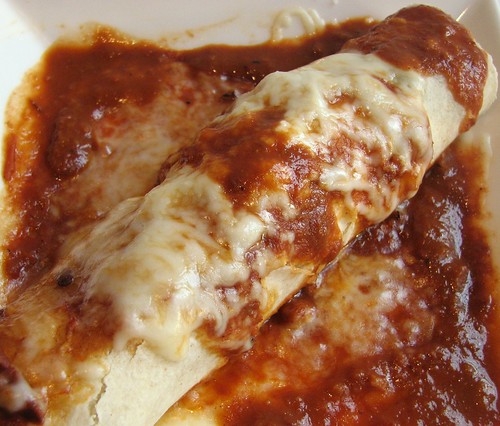
I however, had greater problems that day. I couldn’t eat the mole. That’s because it is usually made with lard, meat and meat stock. Ever since then I’ve been wanting to make a vegetarian mole. 101 Cookbooks has a great, easy recipe for veggie mole here. Rick Bayless has a much more complex 30 ingredient recipe here (you can easily adapt this to be vegetarian). I wanted something in the middle – a spicy, complex sauce that doesn’t take 3 days to make. So I came up with this version. I’ve interpreted mole rather loosely in this recipe and used it as an enchilada sauce. The dish turned out great – I made 12 enchiladas and they were all gone (there was only 2 of us eating)! I like to put cheese inside and on top of the enchilada. And I love what the dark chocolate does to the sauce – it adds an incredible depth, aroma and silkiness.

Note: This recipe yields more sauce than you need. I like to make larger amounts of sauce and freeze it for another day.

Ingredients

For Tortillas

Fresh Spinach – a 10 oz bag
Pinto Beans – 1 can
Corn Tortillas – 12
Mozzarella cheese – 2 cups shredded
Goya Adobo seasoning or salt

For sauce

Tomato – 2
Onion – 1 small
Garlic – 3 cloves
Hot Red Chile – 3 tbsp (I used frozen hot red chile from New Mexico)
Chipotle chiles in Adobo sauce – 3 chiles
Ancho or Pasilla Chile – 1, optional
Cumin powder – 1/4 tsp
Goya Adobo Seasoning or salt – about 1/2 tbsp
Vegetable stock – 1 can
Bitter sweet chocolate chips – 2 tbsp, I used Ghirardelli
Bread – 1 slice
Peanuts roasted – 1 tbsp
Olive oil – 1 tbsp

Pre heat oven to 375. Chop the onion and tomatoes.

Boil a cup of water in a kettle. Cut the stem off the ancho chile, devein it and remove all seeds. Place the ancho chile on a flat non stick pan on medium heat, toast the chile about 20 seconds each side or just until it turns brown. Place the ancho in a bowl, pour the boiling water over and let it soak.

Heat a sauce pan with oil. Add the onion and saute till translucent. Then add the garlic, cook 30 seconds. Add chopped tomatoes, cumin powder and adobo seasoning or salt. Saute till the tomatoes break down.

Scoop the tomatoes mixture into a blender. To this add the peanuts, soaked ancho chile, bread slice and vegetable stock. Puree into a smooth sauce. Return the sauce to the pan and let it come to a boil. Then lower heat and simmer on low for 15 minutes. In the end, finish off the sauce by adding the chocolate chips and stirring well till the chocolate melts and incorporates into the sauce.

To make the enchiladas: Heat a large, hot non stick pan. Add the fresh spinach leaves with some adobo seasoning or salt. Toss the spinach till it just about wilts – about 1 minute. Drain the pinto beans well. Microwave the tortillas for about 20 seconds to make them soft. Spoon some sauce onto to bottom of a baking dish. Lay out a softened tortilla on your work surface. Spoon in some of the spinach, cheese and beans on a tortilla and roll it up tightly. Place it seam side down on the baking dish. Repeat for all tortillas.

Pour more sauce over the tortilla rolls. Top with more shredded cheese. Bake in the oven for about 15 minutes or till the cheese has melted.

Garnish with cilantro, lettuce shreds and red onions. Serve with guacamole and sour cream.

You will have left over sauce from this recipe; this will freeze well.

Sprouted Mung Bean Curry

There is nothing like coming home on a cold autumn day to a bowl of steamy, cilantro scented, home sprouted beans. The mung beans take about 3 days to sprout, but are well worth the effort. This curry is great with rotis or rice; but I eat it just as it is. The quantities below will make about 8 servings, scale down if you need to.

To sprout mung beans: You need about 3 days to sprout the beans. Start by washing the beans well and soaking them in warm water over night. Then drain the beans and tie them into a bundle using cheese cloth. Place your mung bean bundle in a dish with a lid in a dark place. You will have sprouted mung beans in 2 days! For detailed instructions, see this video from http://showmethecurry.com/

Ingredients

Sprouted Mung Beans – 2 1/2 lbs. See video above for sprouting instructions
Onion – 1 large
Tomatoes – 3
Garlic paste – 2 tbsp
Ginger paste – 2 tbsp
Cumin – 1/2 tsp
Turmeric – 3/4 tbsp
Chili powder – 1/2 tbsp
Cumin powder – 1 tbsp
Coriander powder – 1 tbsp
Lemon juice – 1-3 tbsp
Cilantro for garnish
Oil – 2 tbsp
Salt – 1 1/2 tbsp

Chop the onion and tomatoes.

In a large skillet, heat the oil and add the cumin. When its fragrant, add the chopped onions. Saute till onions are soft. Then add the tomatoes and ginger garlic paste. Cook till the tomatoes break down. Now add the turmeric, chili powder, cumin and coriander powders. Saute for 30 seconds.

Slowly add the sprouted mung beans, salt and 6 cups of water. Bring to a boil. Cook beans on medium heat for about 15 minutes. Beans should be tender but not mushy. Turn off heat, stir in lemon juice and chopped cilantro. Taste the curry before adding the lemon; if your tomatoes are tart enough you might not need the lemon.

Sweet Sticky Rice Sushi

When we go out to eat sushi we always sit at the sushi bar. Mainly because S likes being perched on high bar stools. Sitting at the sushi bar gives me an advantage too. I can watch the sushi chef to make sure he washes his fishy hands before making my veggie sushi (usually oshinko). Making sushi at home however is problem free. For one, its cheaper, and I dont have to police fishy hands. No worrying about a lone fish roe clinging to my sushi roll! The best part is, I can play around and experiment with sushi ideas. Like sweet sticky rice sushi. I like rice paper wraps, I like sticky rice and I like adzuki beans. So I put them all together to make a dessert sushi. The rice paper does the job of the seaweed in a traditional sushi roll. The rice is cooked in coconut milk and rolled with a sweet adzuki bean filling. Its fun to experiment with the food coloring in this recipe. I love sakura mochi, so I tried to recreate the cherry blossom color by adding two drops of red coloring to the rice. The rice paper is colored to look like seaweed, exact food coloring proportions are below. I feel a little like Sandra Lee with all the food coloring!

Ingredients

Adzuki beans – 1/2 cup
Sugar – 7 tbsp (3+4). This will yield a mildly sweet sushi. Add more sugar if you like.
Sushi Rice – 1 1/4 cup
Coconut milk – 1 1/4 cup
Sesame seeds – 1/2 tbsp, toasted
Rice paper wraps – 6
Food coloring – red, blue, green
Salt – 1/4 tsp

To make the Adzuki beans: place the beans in a large pot with a lid. Add plenty of water and 1/4 tsp salt. Bring to a boil. Reduce to a simmer, put the lid on and let it cook. The beans should be done in about 1 1/2 hours. If you have excess water, drain it. Return the beans to the stove and let the moisture evaporate. Then add 3 tbsp sugar. Mix well and keep aside.

To make rice: While the beans are cooking, place the sushi rice, 1 cup water and 1 1/4 cup coconut milk in a pan. Bring to a boil. Then reduce heat, put a lid on and let the rice cook, about 25 minutes. The rice should have absorbed all the liquid. Turn off heat, add 4 tbsp sugar, the toasted sesame seeds, and 2-4 drops red food coloring and mix well. This will give you pink colored rice. Change up the colors as you like.

To make sushi rolls: Place a rice paper wrap on your work surface. In a small bowl, mix 2 tbsp water and 1 tsp sugar. To make a seaweed color, add food coloring to the sugar water in the following proportions: 10 drops green+4 drops blue+3 drops red. Using a basting brush, brush this colored water all over the rice paper wrap. Turn it over and brush the other side as well. In about 30 seconds the rice paper wrap will be soft and pliable. If your rice paper is still stiff, use warmer water or just use more water to brush on and let it soak another 30 seconds.

Now spread the rice evenly all over the rice paper; using your fingers is the easiest way to do it. Arrange the beans on top of the rice, but only on the end closest to you. Now, roll the rice paper away from you forming a sushi roll. Cut into pieces with a sharp knife.

Some Tasty Variations

Instead of adzuki beans, use fruits in the center of the roll. Mangoes or pineapple will work well.

To recreate fish roe, color some sesame seeds with orange food coloring and sprinkle on top of the cut sushi.

Curry Leaf Rice

I have known my friend, S for nearly 17 years. But it was only a few months ago that I found about about his love of curry leaves. S visited us from New Mexico a few days ago. He came bearing all sorts of goodies from New Mexico – Pinon nuts, jalapeno peanut brittle and red chile. In return, I decided to make him a dish featuring his favorite curry leaves. In fact, S was supposed to sleep in one morning, but woke up early and came down to the kitchen when he smelled the curry leaves cooking! Who can resist the rich, earthy aroma of curry leaf! This is an easy recipe, and fresh curry leaves add a lot of flavor to the rice. You can try it with cilantro too. We had this curry leaf rice at our wedding dinner. I fell in love with the flavors at the tasting and the caterer was kind enough to give me the recipe. His had a ton of butter (or was it ghee?) and fried cashew nuts. I cut out both and just used oil. I also added the coconut meat.

Ingredients

Long Grain Rice – 2 1/2 cups (I used Basmati)
Curry Leaves – 1 1/2 cups loosely packed
Coconut – 1/4 cup
Onion – 1 large
Ginger-Garlic Paste – 1 tbsp
Cumin Seeds – 1 tsp
Cloves – 4
Green Chili – 1
Lemon Juice – 2 tbsp
Oil – 4 tbsp
Salt

Heat one tsp of oil in a non stick saute pan, add the curry leaves and coconut and saute for 1 minute or until the curry leaves are fragrant. Let it cool slightly and then blend into a paste using about 1/2 cup water

Dice the onion. Heat another pan with the remaining oil. Add the chili, cumin seeds and cloves, after 30 seconds, add the onions. Saute till the onions are transcluscent. Now add the the ginger garlic paste. Saute another 30 seconds. Add the rice and stir for about 4 minutes on medium heat.

Then add the curry leaf paste, salt, lemon juice and 2 cups of water. Turn heat to high and let the rice come to a boil. Then reduce heat to low, and cover with a lid. Rice should be done in about 10 minutes. Turn off heat and let the rice sit for another 5 minutes.

Spread the rice on a large plate or platter and let it cool. This will ensure that the rice doesn’t turn mushy.

Kale and Jumping Corn Saute with Chili Lime Salt

I like blackened corn, so I was cooking some on my skillet on high heat for this dish. Just then, the big fat fly that has taken up residence in my kitchen appeared. Ive been trying to evict this fly for 4 days now. I even put some sugar by the window, hoping it would come for the sugar and I could shoo it out the window. But this is one healthy fly; it didn’t come for the sugar, but the minute i took the kale out, there it was! So I went chasing after it with tea towel in one hand and bug spray in another. By that time I had forgotten about the corn in my skillet. Having given up on the wild fly chase, I came back to the stove to find the sweet corn kernels jumping! They were all popping up and down in the skillet! (There was very little oil in the pan and it was very hot, I think that’s what made the corn kernels jump). So I decided to name them jumping corn.

Whether your corn is jumpy or not, this is a quick and easy recipe to make. I had it with left over quinoa. I decided to use the Chili Lime Salt I made a few days ago instead of regular salt. You can use regular plain salt and some paprika instead.

Ingredients

Kale – 1/2 bunch
Sweet Corn – 3/4 cup
Onion – 1/2
Garlic – 1 clove
Red Wine Vinegar – splash
Nutmeg – pinch
Chili Lime Salt (see this post for recipe) or substitute with salt and paprika
Sugar – pinch
Oil – 1 tsp

Slice the onion very thinly. Shred the kale into thin strips. Mince the garlic. In a non stick pan or skillet, heat the oil and add the onion and let it brown. When browned, sprinkle the sugar on top of the onion and push it off to one side of the skillet.

Turn the heat to high and add the corn. Position your skillet so that the heat source is right under your corn and not under the pile of onions on your skillet. Cook the corn about 3 minutes or till it turns brown (and jumpy!).

Now toss the onions and corn together. Lower heat. Add the garlic, saute till fragrant, about 30 seconds. Then add the kale, nutmeg, red wine vinegar and chili lime salt. Cook on medium heat till the kale is just wilted, about 2 minutes.

Chili Lime Salt

Chili lime salt is a great way to add interesting flavors to your foods and flavored salts are so easy to make. Try sprinkling  flavored chili lime salt on roasted nuts or popcorn or use in your everyday cooking.

Ingredients

Kosher Salt – 1/4th cup
Paprika – 2 tsp
Lime Juice – 1 tbsp

Place all ingredients in a food processor and blend together – as coarse or fine as you like. If needed, adjust lime and chili according to taste. Store chili lime salt in an air tight container.

Related Posts with Thumbnails