

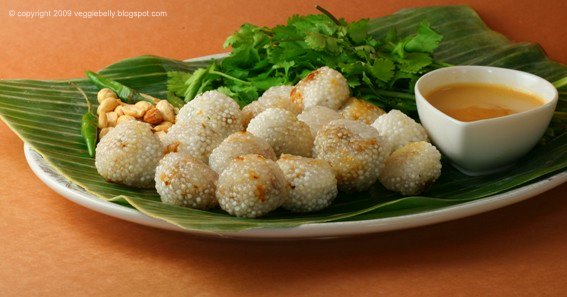
For a long time now I’ve been wanting to try out a savory tapioca pearl recipe. Until I made this dish, Ive only had tapioca pearls in puddings or in bubble tea. But Saku Sai (or sakoo sai) is a great way to enjoy the chewy texture of tapioca pearls in a savory dish. ‘Saku’ means tapioca and ‘sai’ means stuffed. Traditional Thai saku sai is filled with pork (saku sai mu) and the filling is slightly sweet. I made a savory filling with peanuts and morningstar crumbles and served the dumplings with a dipping sauce. This makes a great appetizer. I served the dumplings on a platter lined with a banana leaf. They were all gone in 5 minutes!
This is is my entry for the AWED Thailand event.
Thai Tapioca Pearl Dumplings (Saku Sai)
about 20 dumplings
Tapioca pearls – 1 cup
Boiling water – 1 1/4 cups
Morningstar Crumbles (frozen) - 1 cup (or crumbled tofu or your choice of minced mixed vegetables)
Peanuts – 1/4 cups
Onion – 1 very small
Ginger, minced – 1 tbsp
Garlic – 2 cloves
Soy sauce – 1 tbsp
Cilantro – 2 tbsp chopped
Vegetable Oil – 1 tbsp
Sesame oil – 1 tsp to coat dumplings
Finely chop the onion. Mince the ginger and garlic. Chop the cilantro. Coarsely chop the peanuts in a food processor.
Heat a skillet with oil. Add the onion and saute till brown. Then add the ginger and garlic and cook till fragrant, about 45 seconds. Stir in the morningstar crumbles, peanuts and soy sauce. Cook till the crumbles have thawed and become soft. Mix in cilantro and turn off heat.
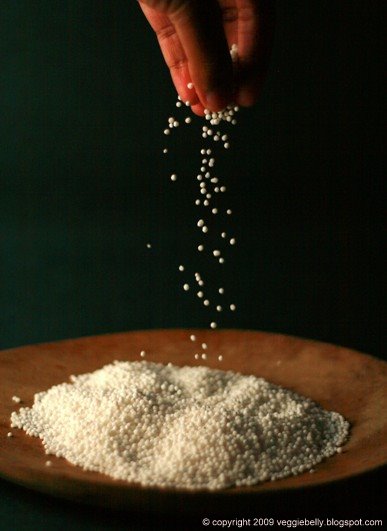
Place the tapioca pearls in a bowl. Add the boiling water a little at a time. Knead the pearls to form a mass. They should not be dry but must resemble tight dough.
UPDATE: some readers have had trouble forming the tapioca ‘dough’. You may need more or less water depending on the brand and size of tapioca pearls you are using. Its important to add the boiling water a little at a time, untill you get a dough like consistency that you can stuff and form into balls easily.
Keep a bowl of water near you. Dip your fingers into the water. Then take about a tablespoon of the tapioca pearls mixture and form a disc. Place a small amount of morningstar crumble mixture on the center of the disc. Bring the sides up and form into a ball. Dip your fingers in water as you go to prevent sticking.
Place the balls in a steamer, make sure they don’t touch each other. Steam for about 30 minutes or till the tapioca pearls are completely transparent.
Don’t go by the pictures in the post, where you can still see some white tapioca pearls. I realized they were under done after taking the photos. So I put them back in the steamer till they were completely transparent.
When you remove the dumplings from the steamer, spray or coat them with a little sesame oil so they don’t stick to each other.

Serve dumplings with cilantro, Thai chillies, crushed peanuts and soy-sesame dipping sauce.Soy-Sesame Dipping Sauce
Soy sauce – 1/4 cup
Sesame oil – 1/4 cup
Water – 1/4 cup
Peanuts – 2 tbsp
Rice wine vinegar – 1 tbsp
Honey – 2-3 tbsp
Ginger, minced – 1 tsp, optional
Put all ingredients in a blender and blend till well combined.
Note: You can find tapioca pearls in any Asian store. Buy the white, small sized pearls.
Those look sooo cute!I have to try them!
[Reply]
I have to learn how to make this.
There used to be this Thai market in Las Vegas and they would sell them there.
Now they’ve shut down, I can’t find it anywhere!!! UGH!!!
Thanks for posting this. I can’t find the recipe anywhere else on the internet.
[Reply]
I love this idea but 1 1/4 cups of water left me with soggy porridge that I couldn’t form into balls. Any suggestions? Thanks!
[Reply]
Sala @ Veggie Belly Reply:
January 11th, 2011 at 6:56 pm
did you add the water a little at a time? depending on the brand and size of tapioca pearls you use, you may need less or more boiling water. You need to add the boiling water to the tapioca a little at a time till it forms a mass.
[Reply]
Sarah Reply:
January 11th, 2011 at 6:59 pm
That must have been my problem — I added it a little at a time but didn’t stop before I made it to 1.25. I guess I figured it’d firm up as I kneaded. Thanks for the quick response! I’ll definitely use this knowledge next time.
[Reply]
Sala @ Veggie Belly Reply:
January 11th, 2011 at 7:01 pm
ive updated the post with this info i should probably add some step-by-step photos for this recipe..
I was so excited to try this and went out of my way to find the ingredients. Didn’t work at all no matter how hard I tried I could not form the dumplings. With less water the mixture didn’t stick and with a little more they just fell completely apart. Disappointing.
[Reply]
I tried these and they were delicious. The first ones turned out a little bit ugly, but once I got the hang of making sure that the dough was the right consistency, they started to look as beautiful as those in the picture. So…don’t give up!
[Reply]