Baked Pear Parcels with Lemon Chamomile Sauce

by Sala @ Veggie Belly on January 19, 2009


baked pear

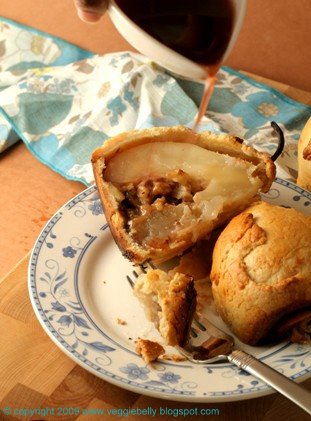
The MLK weekend and the Presidential Inauguration tomorrow have put me in a festive mood. Despite the freezing temperatures, I’m feeling celebratory. So much so that I took the trouble to make the crust from scratch for this dish. The crust is actually easy to make, it just takes time. Its worth the effort though. The pears wrapped and baked in the dough look gorgeous. I got the idea from this recipe on the BBC Good Food website. This tastes like a pear pie but looks infinitely better!

Baked Pear Parcels
makes 2 generous servings

Bosch Pears -2 (ripe but firm)
Walnuts – 3 tbsp
Brown sugar – 2 tbsp
Flour – 1 tbsp

For the crust
All purpose flour – 4 oz
Butter – 4 oz (I used Land O’ Lakes light butter)
Sugar – 1/4 cup
Salt – a pinch
Vanilla extract – 1/8 tsp

Preheat oven to 375F.

To make the crust, combine all ingredients (flour through vanilla) in a bowl. Using your finger tips, rub the butter into the flour. Do not knead. Rub the flour and butter till it forms a crumbly mixture. Press the crumbs into a ball. Cover the dough ball in plastic wrap and refrigerate for 30 minutes.

While the dough is in the fridge, work on the pears. Peel the pears. Make a thin slice on the bottom of the pears so that they can sit stably. Core the pears and remove the seeds. I used the tip of a potato peeler to do this.

Crush the walnuts lightly. Combine them with the brown sugar and flour. Fill the cored inside of the pear with the walnut-sugar mixture. Pack the mixture into the pear cavity.

When the dough is chilled, take it out of the fridge and divide it into two. Roll out each portion into a rough round. Place a pear in the middle of one dough round. Lift the sides of the dough up and press together over the pear to form a parcel. This doesn’t have to be perfect. Pinch off any excess dough. Patch up any empty spots (dip you finger tips in water to seal edges).

Brush the pear parcels with milk or egg wash. Bake in the over for 50-60 minutes or until the pear parcels are golden. Cool 10-15 minutes before serving.

Serve with lemon chamomile sauce (recipe below), ice cream or whipped cream.

Lemon Chamomile Sauce

Water – 1 1/2 cups
Chamomile tea bags – 2
Lemon juice – 1 1/2 tbsp
Malbec Jam - 3 tbsp (click here to win a bottle of Malbec Jam!). Alternatively, use 3 tbsp of honey and 1 tbsp of red wine.
Brown sugar – 1 tbsp, you can use regular sugar instead. Use more sugar for a sweeter sauce.
Lemon zest – 1/8 tsp

Boil the water in a sauce pan. When the water comes to a boil, add the chamomile tea bags. Boil for 30 seconds. Turn off heat and let the tea steep for about 7 minutes. Remove tea bags.

Turn the heat back on and add all the remaining ingredients to the tea. Simmer till the sauce has reduced to about 60% of its original volume.

Serve with baked pear parcels.

Related Posts with Thumbnails

{ 33 comments… read them below or add one }

1 Beatrice January 20, 2009 at 1:31 am

Beautiful! Wow.

[Reply]

Reply

2 Jennifer January 20, 2009 at 2:23 am

These are absolutely beautiful! I bet they taste as good as they look.

[Reply]

Reply

3 Esi January 20, 2009 at 2:23 am

This looks so beautiful, like a pie but in a cuter package!

[Reply]

Reply

4 delhibelle January 20, 2009 at 3:09 am

Gorgeous!

[Reply]

Reply

5 Shawnda January 20, 2009 at 3:47 am

Absolutely beautiful!

[Reply]

Reply

6 Dana Treat January 20, 2009 at 4:00 am

Is it just me or has your photography stepped up a BIG notch lately? Just lovely.

[Reply]

Reply

7 rekhas kitchen January 20, 2009 at 4:10 am

wow wow wow simply superb i have to try this sure and cucumber no no not what we use in salad s if you are in us just try for lemon cucumber or if you find any indian store then sambar cucumber the yellow one s

[Reply]

Reply

8 Hayley January 20, 2009 at 4:17 am

I found you through Tastespotting, because how could I not click on that lovely photo! This is the best presentation of food I have seen in quite some time.

[Reply]

Reply

9 Cham January 20, 2009 at 5:24 am

U know what I ve seen in Xmas cooking magazine this baked pear one month ago. Voila, u bake one beauty! U ve a great sense of capturing too…

[Reply]

Reply

10 Maya January 20, 2009 at 12:23 pm

Beautiful pears!

[Reply]

Reply

11 Grace January 20, 2009 at 12:57 pm

holy smokes, this is awesome! i think i love anything arriving in wrapped form, and if the wrapping is pastry, well, that can’t be beaten. :)

[Reply]

Reply

12 flutterbyblue January 20, 2009 at 2:00 pm

These are beautiful!!! How creative and fun! I’ve never had such a dessert – your photos make the dish look so delectable!

[Reply]

Reply

13 Andrea January 20, 2009 at 2:05 pm

Wow, those are just amazing! I love the little dough leaves. I’m sure they were just as delicious as they look!!

[Reply]

Reply

14 Secret Server January 20, 2009 at 2:38 pm

That is definitely one of the most beautiful dishes I have ever seen. I hope I feel confident enough to try it someday.

[Reply]

Reply

15 jillian January 20, 2009 at 3:04 pm

Gorgeous! This looks beautiful and sounds delicious!

[Reply]

Reply

16 once in a blue moon... January 20, 2009 at 3:17 pm

just beautiful, love it!

[Reply]

Reply

17 Fearless Kitchen January 20, 2009 at 3:34 pm

This looks beautiful! I haven’t tried working with the Land o’Lakes Light butter – does it make a big difference in the dough?

[Reply]

Reply

18 anna January 20, 2009 at 6:08 pm

Those are so cute and sound delicious! I might have to try this sometime.

[Reply]

Reply

19 Sara January 20, 2009 at 6:52 pm

Ooooh, this is so pretty! Looks delicious. :)

[Reply]

Reply

20 Laavanya January 20, 2009 at 7:06 pm

They do make for a stunning & pretty presentation… I made something similar with halved apples, walnuts & brown sugar wrapped in puff pastry.. delicious. Sauce sounds very exotic too.

[Reply]

Reply

21 Marysol January 20, 2009 at 7:34 pm

Those are just too pretty to eat, but I’d be willing to make the sacrifice.

[Reply]

Reply

22 Gina January 20, 2009 at 9:16 pm

Oh my gosh, totally gorgeous!!

[Reply]

Reply

23 Nidhi January 20, 2009 at 11:43 pm

Very beautiful!!

[Reply]

Reply

24 anudivya January 21, 2009 at 5:01 am

Are you kidding me? That looks gorgeous… and I first thought that it was the pear that you actually carved then I saw the dough pics and recipe.
You are one talented girl. I cannot imagine doing that.

[Reply]

Reply

25 TBC January 21, 2009 at 3:13 pm

Now that is just too pretty to be eaten! What a gorgeous presentation!
How did you make that leaf?

[Reply]

Reply

26 kitchenetta January 21, 2009 at 3:55 pm

I am all over this! Wow.

[Reply]

Reply

27 DEESHA January 21, 2009 at 6:02 pm

wow that looks gorgeous

[Reply]

Reply

28 Sala January 21, 2009 at 7:11 pm

really pretty sala. can i use an apple instead of the pear? must try this over the weekend

[Reply]

Reply

29 Chris January 22, 2009 at 4:33 am

Whoa!! I had never thought of maintaining the shape of the pear and wrapping it in pastry – what an excellent idea! I am tempted to try this with some Royal Riviera pears that recently arrived at my doorstep, but am afraid they’re too juicy. Any thoughts?

[Reply]

Reply

30 Olga January 24, 2009 at 8:13 pm

oh, wow! That is so very pretty. Very impressive.

[Reply]

Reply

31 veggie belly January 25, 2009 at 2:19 am

Fearless, I used the light butter because thats what I had on hand – its half canola oil and half butter. I usually dont buy regular butter. But I suspect the crust will taste even better with regular butter :)

TBC, the dough leaf is easy. I just rolled out a little dough and cut out a leaf shape using a knife. I made the veins on the leaf using a toothpick. Then I stuck the leaf onto the dough wrapped pear using a dab of water. Its that simple!

Sala, I’m sure apples will be great too, but the baking time might vary slightly.

Chris, you are right, I think Royal Riviera pears might be too soft and creamy for this recipe. But I hope you enjoy them as is!

[Reply]

tony Reply:

Is there any water used to make the dough?

[Reply]

Sala @ Veggie Belly Reply:

no, there is enough butter to hold the dough together.

[Reply]

Reply

32 Ruth Brown April 3, 2010 at 1:32 pm

I woould like to try this but you do not indicate what temp the oven should be on.

[Reply]

Sala @ Veggie Belly Reply:

Ive indicated the oven temp under the list of ingredients. Its 375F.

[Reply]

Reply

33 Warren July 12, 2010 at 6:06 pm

Sala,
How did you get the crust to stay on the pear so perfectly? When I baked my pears the crust fell off the pear and left holes. What happened is the butter starts to melt in the dough which gave it form and started to slide down the pear. I would appreciate your help on any pointers on what you did.

Your photos are great. Do you have any pointer for me on taking pictures of food?

Thanks again,
Warren

[Reply]

Sala @ Veggie Belly Reply:

You could try chilling the rolled out dough before covering the pear with. Or try dustingn the pear with some flour so its not too wet, and the dough will stick to it. Also make sure you gently but firmly press the dough on to the pear, using both hands.

[Reply]

Reply

Leave a Comment

Comment using OpenID

Page 1 of 11

Previous post:

Next post: